Your morning brew can go from “fine” to “oh wow” with one upgrade a week.
I love the first sip test.
That tiny moment tells you everything—sweetness, balance, and whether your morning is about to glide or grind.
Over the years (and many slightly obsessive kitchen experiments), I’ve found that big flavor jumps usually come from small, practical tweaks.
You don’t need a café rig. You don’t need a barista certificate. You just need to tighten a few variables and make them work for you—reliably.
Below is a simple “master method” you can use with most light-to-medium roast beans at home, followed by five specific upgrades that each improve the very first sip. Pick one this week, then layer the rest as you go.
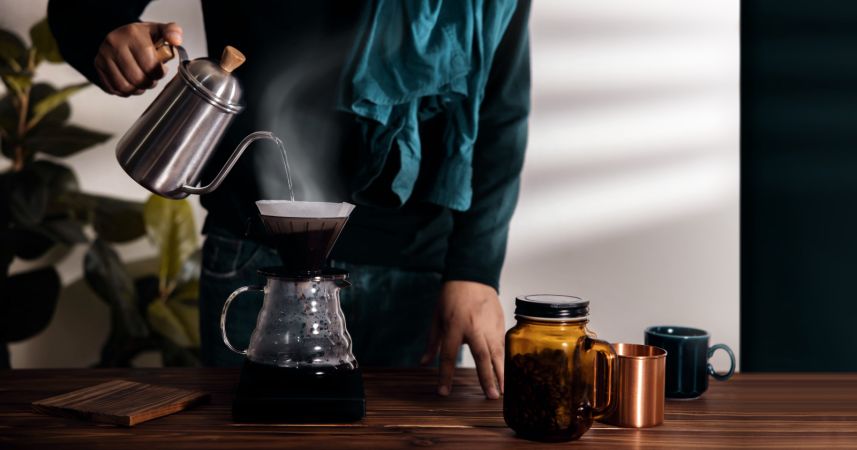
The 5-minute master method (baseline)
Yield: 1 mug (≈300 ml)
Time: 5–6 minutes
Gear: Kettle, burr grinder, digital scale, timer, paper-filter pour-over (e.g., V60, Kalita, Melitta), mug
Ingredients
-
20 g whole-bean coffee (fresh, sealed within the last month)
-
320 g hot water (≈1:16 brew ratio) at 94–96°C / 201–205°F
-
Paper filter, pre-rinsed
Steps
-
Heat water. Place your brewer on a mug, insert filter, and thoroughly rinse the paper with hot water to remove papery flavor. Discard rinse water.
-
Grind beans medium-fine (table salt-ish).
-
Add grounds to the filter and shake the brewer gently to level the bed.
-
Start a timer. Bloom: pour 40–50 g water to saturate all grounds. Gently swirl the brewer. Wait 30–45 seconds.
-
Brew: pour in slow spirals to 200 g by 1:15, then to 320 g by 2:15–2:30. Keep the stream centered, avoid the walls, and finish with a gentle swirl.
-
Total drawdown should land near 3:00–3:30. Taste. If it’s sharp/sour, try finer grind or hotter water next time; if it’s bitter/drying, go coarser or slightly cooler.
This baseline is your control. The upgrades below target the variables that shift first-sip quality most.
1. Better water
If you change nothing else, change your water. The right minerals help dissolve flavor compounds evenly, supporting sweetness and clarity instead of dullness or bite.
What you need
-
Distilled or reverse-osmosis (RO) water as a blank canvas
-
A mineral recipe (DIY or premixed sachets) designed for coffee
-
Optional: a cheap TDS pen to sanity-check consistency
Steps
-
Start with distilled/RO to remove wildcards (chlorine, excessive hardness).
-
Add minerals to reach a balanced profile—enough hardness to aid extraction, enough alkalinity to buffer acidity, but not so much that it tastes chalky.
-
Mix in a clean bottle and label it. Brew as usual.
Why it changes the first sip
Water governs extraction. Balanced hardness and alkalinity pull out the good stuff—acids, sugars, aromatics—without overemphasizing dryness. The result is that first sip tastes sweeter, rounder, and cleaner.
Try this
-
If you prefer juicy brightness, choose a water recipe on the lower end of alkalinity.
-
For chocolatey comfort, a slightly higher alkalinity can mellow acidity and push sweetness forward.
2. A real burr grind (and a quick calibration)
Blade grinders chop; burrs cut to size. That means more even extraction and less harshness on the tongue. But the hidden upgrade is calibration—setting your grinder to a sweet spot for your beans and brew gear.
What you need
-
A burr grinder (hand or electric)
-
Your usual beans and brewer
-
A small bowl or tray for catching grinds and inspecting
Steps
-
Choose a starting setting that tastes close with your current beans (for many home grinders, somewhere in the middle range for pour-over).
-
Brew the master method. If your first sip is sharp/sour, move one “click” finer; if bitter/drying, move one “click” coarser.
-
Repeat with tiny changes until your sip starts sweet and finishes clean.
-
Lock it in: jot the setting on the bag with date and brew device.
Why it changes the first sip
Uneven grind = uneven extraction. You taste that as sourness at the start (under-extracted fines dominate early) or rough bitterness at the end (boulders lag). A tighter grind distribution makes the first sip balanced from the jump.
Try this
-
For washed Ethiopians and other high-acid coffees, a hair finer often sweetens the attack.
-
For darker or very fresh beans, go a touch coarser to reduce bitterness and astringency.
3. A smarter bloom
Most home brewers under-bloom: dry pockets hide in the bed and start your brew patchy. A better bloom saturates everything and vents CO₂ fully, so the early extraction (a.k.a. the first sip) isn’t hollow.
What you need
-
Your brewer, kettle, scale, and the same baseline recipe
-
2 extra moves: an agitation swirl and a longer bloom time
Steps
-
Pour 2–2.5x coffee weight for bloom (40–50 g for 20 g coffee).
-
Stir or swirl lightly to disperse clumps—think one gentle stir with a spoon or one wrist circle.
-
Extend the bloom to 45–60 seconds if your coffee is very fresh or gassy.
-
Resume your normal pour schedule.
Why it changes the first sip
Full saturation + gas release = more even early extraction. The first sip tastes fuller, less thin, with aromatics that actually show up.
Try this
-
If your bloom collapses or channels, you went too aggressive; keep agitation light.
-
If the first sip still feels hollow, add another 10 seconds to bloom and try again.
4. Temperature you can repeat
If your kettle temp swings, your flavor will swing with it. Stable, repeatable water temperature makes that first sip predictable—bright when you want bright, rounded when you want rounded.
What you need
-
Ideally, a variable-temperature kettle
-
If not, a simple boil-and-wait routine and a kitchen thermometer
Steps
-
For most light-to-medium roasts, target 94–96°C / 201–205°F.
-
With a variable kettle, set the temp and hold.
-
Without one, bring to a rolling boil, wait 30–45 seconds, then measure. Adjust the wait time until you reliably hit your target.
-
Note the temp on your bag alongside your grinder setting.
Why it changes the first sip
Hotter water extracts faster and emphasizes brightness; cooler water slows extraction and emphasizes chocolate/nut tones. Locking a temp locks the opening flavor so your first sip doesn’t surprise you.
Try this
-
If your first sip is too tangy, drop 1–2°C and taste again.
-
If it tastes flat, bump 1–2°C.
5. A gentle finish (swirl, settle, serve)
The last seconds of a pour-over can make or break clarity. A chaotic finish stirs fines into the cup; a gentle finish settles them and keeps the first sip clean.
What you need
-
Your usual brewer and mug
-
A simple serving habit
Steps
-
After your final pour, give one small swirl to even the bed, then stop. Let gravity do the rest.
-
When drawdown ends, don’t over-drip. Lift, tilt once to avoid a last drop of fines, and serve.
-
Give the finished cup a quick swirl in the mug to homogenize, then sip.
Why it changes the first sip
Fewer suspended fines = less chalky texture and bitterness on contact. That first taste lands silky and sweet.
Try this
-
If your brewer consistently clogs near the end, your grind may be too fine or your filter paper too dense. Adjust one variable at a time.
The “first sip” upgrade bundles (quick recipes)
Use the baseline method above, then apply one of these bundles to fit your flavor mood. Each bundle stacks two or more upgrades that play well together.
Sweet & juicy bundle
-
Water: lower alkalinity profile.
-
Grind: one click finer.
-
Temp: 96°C / 205°F.
-
Bloom: 50 g + 60 seconds with a gentle swirl.
Result: brighter aromatics, sweet citrus/stone fruit, a clean tang that softens quickly.
Chocolate & cozy bundle
-
Water: slightly higher alkalinity.
-
Grind: one click coarser.
-
Temp: 92–93°C / 198–199°F.
-
Bloom: 40 g + 30–40 seconds, minimal agitation.
Result: round body, cocoa and caramel notes, a softer first sip that feels comforting.
Ultra-clean clarity bundle
-
Water: neutral-mineral recipe.
-
Grind: tuned for a 3:00–3:15 drawdown.
-
Temp: 94–95°C / 201–203°F.
-
Finish: strict gentle finish + immediate serve.
Result: high clarity, tea-like sweetness, first sip is crisp without bite.
Simple troubleshooting table
-
First sip is sharp/sour: Finer grind, hotter water, slightly longer bloom.
-
First sip is bitter/drying: Coarser grind, cooler water, reduce agitation.
-
First sip is thin/watery: Increase dose to 21–22 g at the same water weight or extend contact time by pouring a bit slower.
-
First sip is papery: Rinse your paper filter more thoroughly with hot water.
-
First sip lacks aroma: Grind right before brewing and store beans airtight, away from heat and light.
A quick note on freshness and storage
Fresh is good; stable is better.
Buy in amounts you’ll finish in 2–3 weeks. Keep beans in a dark, airtight container at room temperature.
If you buy in bulk, freeze in small, airtight portions and grind straight from frozen—texture and first-sip aromatics stay surprisingly intact.
What I’ve noticed in my own routine
I’ve mentioned this before, but the day I switched to mineral-balanced water, my morning cup jumped a full letter grade—without changing beans or gear.
A week later, I dialed in my grinder by one single click and extended my bloom by 15 seconds.
The very first sip went from “huh, interesting” to “oh wow, sweet.” That’s the whole game: tiny changes, stacked.
The bottom line
Your first sip is a report card on a few controllable variables. Start with water, lock your grind, bloom like you mean it, keep temperature consistent, and finish gently. Pick one upgrade this week. Next week, add another.
Before long, that first sip will tell you you’ve built a ritual worth waking up for.
Print-friendly checklist
-
Use balanced coffee water (mix or recipe).
-
Grind with burrs and calibrate one click at a time.
-
Bloom fully (2–2.5x dose, 45–60 s, gentle swirl).
-
Keep temperature steady and noted.
-
Finish gently, serve immediately, and enjoy the first sip.